Electromagnetic Matrix and Interstellar Logistics Station: Difference between pages
imported>76561198121518784 |
imported>76561198018895007 No edit summary |
||
| Line 1: | Line 1: | ||
<div style="float: right; clear: right;"> | <div style="float: right; clear: right;"> | ||
{{:{{PAGENAME}}/ItemInfo}} | {{:{{PAGENAME}}/ItemInfo}} | ||
</div> | </div> | ||
==Summary== | ==Summary== | ||
You can find a tutorial on how the logistics stations work [[Logistics_Stations|here]]. | |||
==Production Chain== | ==Production Chain== | ||
{{ProductionChainTable/head}} | {{ProductionChainTable/head}} | ||
{{ProductionChain | {{ProductionChain | ||
|Building= | |Building=Assembler | ||
|Replicator=Yes | |Replicator=Yes | ||
|Technology= | |Technology=Interstellar Logistics System | ||
|Recipe= | |Recipe={{ItemRecipe | ||
|Out1=Interstellar Logistics Station | |||
|Out1Qty=1 | |||
|CraftTime=30 s | |||
|In1=Planetary Logistics Station | |||
|In1Qty=1 | |||
|In2=Titanium Alloy | |||
|In2Qty=50 | |||
|In3=Particle Container | |||
|In3Qty=20 | |||
}} | |||
}} | }} | ||
|} | |} | ||
===Production Progression Chart=== | |||
{| class="wikitable" style="text-align:center; background-color:#0b161c | |||
|+ Unipolar Magnet-based production | |||
! Stage 1 | |||
! Stage 2 | |||
! Stage 3 | |||
! Stage 4 | |||
! Stage 5 | |||
! Stage 6 | |||
|- | |||
| {{riq|Iron Ore|120}} | |||
| {{riq|Iron Ingot|120}} | |||
| {{riq|Steel|40}} | |||
| {{ppc skip}} | |||
|rowspan=8| {{riq|Planetary Logistics Station|1}} | |||
|rowspan=14| {{riq|Interstellar Logistics Station|1}} | |||
|- | |||
| {{riq|Titanium Ore|80}} | |||
| {{riq|Titanium Ingot|40}} | |||
| {{ppc skip}} | |||
| {{ppc skip}} | |||
|- | |||
| {{riq|Silicon Ore|320}} | |||
| {{riq|High-Purity Silicon|160}} | |||
|rowspan=2| {{riq|Microcrystalline Component|80}} | |||
|rowspan=4| {{riq|Processor|40}} | |||
|- | |||
| {{riq|Copper Ore|80}} | |||
| {{riq|Copper Ingot|80}} | |||
|- | |||
| {{riq|Iron Ore|80}} | |||
| {{riq|Iron Ingot|80}} | |||
|rowspan=2| {{riq|Circuit Board|80}} | |||
|- | |||
| {{riq|Copper Ore|40}} | |||
| {{riq|Copper Ingot|40}} | |||
|- | |||
| {{riq|Unipolar Magnet|200}} | |||
| {{ppc skip}} | |||
|rowspan=2| {{riq|Particle Container|20}} | |||
|rowspan=2| {{ppc skip}} | |||
|- | |||
| {{riq|Copper Ore|40}} | |||
| {{riq|Copper Ingot|40}} | |||
|- | |||
| {{riq|Iron Ore|120}} | |||
| {{riq|Iron Ingot|120}} | |||
| {{riq|Steel|40}} | |||
|rowspan=3| {{riq|Titanium Alloy|40}} | |||
|rowspan=3| {{ppc skip}} | |||
|- | |||
| {{riq|Titanium Ore|80}} | |||
| {{riq|Titanium Ingot|40}} | |||
| {{ppc skip}} | |||
|- | |||
| {{riq|Sulfuric Acid|80}} | |||
| {{ppc skip}} | |||
| {{ppc skip}} | |||
|- | |||
| {{riq|Unipolar Magnet|200}} | |||
| {{ppc skip}} | |||
|rowspan=2| {{riq|Particle Container|20}} | |||
|rowspan=2| {{ppc skip}} | |||
|rowspan=2| {{ppc skip}} | |||
|- | |||
| {{riq|Copper Ore|40}} | |||
| {{riq|Copper Ingot|40}} | |||
|} | |||
{| class="wikitable" style="text-align:center; background-color:#0b161c | |||
|+ Fire Ice-based production | |||
! Stage 1 | |||
! Stage 2 | |||
! Stage 3 | |||
! Stage 4 | |||
! Stage 5 | |||
! Stage 6 | |||
! Stage 7 | |||
! Stage 8 | |||
|- | |||
| {{riq|Iron Ore|120}} | |||
| {{riq|Iron Ingot|120}} | |||
| {{riq|Steel|40}} | |||
| {{ppc skip}} | |||
| {{ppc skip}} | |||
| {{ppc skip}} | |||
|rowspan=14| {{riq|Planetary Logistics Station|1}} {{riq|Hydrogen|20}} | |||
|rowspan=26| {{riq|Interstellar Logistics Station|1}} {{riq|Hydrogen|40}} | |||
|- | |||
| {{riq|Titanium Ore|80}} | |||
| {{riq|Titanium Ingot|40}} | |||
| {{ppc skip}} | |||
| {{ppc skip}} | |||
| {{ppc skip}} | |||
| {{ppc skip}} | |||
|- | |||
| {{riq|Silicon Ore|320}} | |||
| {{riq|High-Purity Silicon|160}} | |||
|rowspan=2| {{riq|Microcrystalline Component|80}} | |||
|rowspan=4| {{riq|Processor|40}} | |||
|rowspan=4| {{ppc skip}} | |||
|rowspan=4| {{ppc skip}} | |||
|- | |||
| {{riq|Copper Ore|80}} | |||
| {{riq|Copper Ingot|80}} | |||
|- | |||
| {{riq|Iron Ore|80}} | |||
| {{riq|Iron Ingot|80}} | |||
|rowspan=2| {{riq|Circuit Board|80}} | |||
|- | |||
| {{riq|Copper Ore|40}} | |||
| {{riq|Copper Ingot|40}} | |||
|- | |||
| {{riq|Iron Ore|160}} | |||
| {{riq|Iron Ingot|160}} | |||
| {{ppc skip}} | |||
|rowspan=4| {{riq|Electric Motor|80}} | |||
|rowspan=6| {{riq|Electromagnetic Turbine|40}} | |||
|rowspan=8| {{riq|Particle Container|20}} {{riq|Hydrogen|20}} | |||
|- | |||
| {{riq|Iron Ore|80}} | |||
| {{riq|Iron Ingot|80}} | |||
| {{riq|Gear|80}} | |||
|- | |||
| {{riq|Iron Ore|80}} | |||
| {{riq|Magnet|80}} | |||
|rowspan=2| {{riq|Magnetic Coil|80}} | |||
|- | |||
| {{riq|Copper Ore|40}} | |||
| {{riq|Copper Ingot|40}} | |||
|- | |||
| {{riq|Iron Ore|80}} | |||
| {{riq|Magnet|80}} | |||
|rowspan=2| {{riq|Magnetic Coil|80}} | |||
|rowspan=2| {{ppc skip}} | |||
|- | |||
| {{riq|Copper Ore|40}} | |||
| {{riq|Copper Ingot|40}} | |||
|- | |||
| {{riq|Copper Ore|40}} | |||
| {{riq|Copper Ingot|40}} | |||
| {{ppc skip}} | |||
| {{ppc skip}} | |||
| {{ppc skip}} | |||
|- | |||
| {{riq|Fire Ice|40}} | |||
| {{riq|Graphene|40}} {{riq|Hydrogen|20}} | |||
| {{ppc skip}} | |||
| {{ppc skip}} | |||
| {{ppc skip}} | |||
|- | |||
| {{riq|Iron Ore|120}} | |||
| {{riq|Iron Ingot|120}} | |||
| {{riq|Steel|40}} | |||
|rowspan=3| {{riq|Titanium Alloy|40}} | |||
|rowspan=3| {{ppc skip}} | |||
|rowspan=3| {{ppc skip}} | |||
|rowspan=3| {{ppc skip}} | |||
|- | |||
| {{riq|Titanium Ore|80}} | |||
| {{riq|Titanium Ingot|40}} | |||
| {{ppc skip}} | |||
|- | |||
| {{riq|Sulfuric Acid|80}} | |||
| {{ppc skip}} | |||
| {{ppc skip}} | |||
|- | |||
| {{riq|Iron Ore|160}} | |||
| {{riq|Iron Ingot|160}} | |||
| {{ppc skip}} | |||
|rowspan=4| {{riq|Electric Motor|80}} | |||
|rowspan=6| {{riq|Electromagnetic Turbine|40}} | |||
|rowspan=8| {{riq|Particle Container|20}} {{riq|Hydrogen|20}} | |||
|rowspan=8| {{ppc skip}} | |||
|- | |||
| {{riq|Iron Ore|80}} | |||
| {{riq|Iron Ingot|80}} | |||
| {{riq|Gear|80}} | |||
|- | |||
| {{riq|Iron Ore|80}} | |||
| {{riq|Magnet|80}} | |||
|rowspan=2| {{riq|Magnetic Coil|80}} | |||
|- | |||
| {{riq|Copper Ore|40}} | |||
| {{riq|Copper Ingot|40}} | |||
|- | |||
| {{riq|Iron Ore|80}} | |||
| {{riq|Magnet|80}} | |||
|rowspan=2| {{riq|Magnetic Coil|80}} | |||
|rowspan=2| {{ppc skip}} | |||
|- | |||
| {{riq|Copper Ore|40}} | |||
| {{riq|Copper Ingot|40}} | |||
|- | |||
| {{riq|Copper Ore|40}} | |||
| {{riq|Copper Ingot|40}} | |||
| {{ppc skip}} | |||
| {{ppc skip}} | |||
| {{ppc skip}} | |||
|- | |||
| {{riq|Fire Ice|40}} | |||
| {{riq|Graphene|40}} {{riq|Hydrogen|20}} | |||
| {{ppc skip}} | |||
| {{ppc skip}} | |||
| {{ppc skip}} | |||
|} | |||
{| class="wikitable" style="text-align:center; background-color:#0b161c | |||
|+ Coal- and Sulfuric Acid-based production | |||
! Stage 1 | |||
! Stage 2 | |||
! Stage 3 | |||
! Stage 4 | |||
! Stage 5 | |||
! Stage 6 | |||
! Stage 7 | |||
! Stage 8 | |||
|- | |||
| {{riq|Iron Ore|120}} | |||
| {{riq|Iron Ingot|120}} | |||
| {{riq|Steel|40}} | |||
| {{ppc skip}} | |||
| {{ppc skip}} | |||
| {{ppc skip}} | |||
|rowspan=15| {{riq|Planetary Logistics Station|1}} | |||
|rowspan=28| {{riq|Interstellar Logistics Station|1}} | |||
|- | |||
| {{riq|Titanium Ore|80}} | |||
| {{riq|Titanium Ingot|40}} | |||
| {{ppc skip}} | |||
| {{ppc skip}} | |||
| {{ppc skip}} | |||
| {{ppc skip}} | |||
|- | |||
| {{riq|Silicon Ore|320}} | |||
| {{riq|High-Purity Silicon|160}} | |||
|rowspan=2| {{riq|Microcrystalline Component|80}} | |||
|rowspan=4| {{riq|Processor|40}} | |||
|rowspan=4| {{ppc skip}} | |||
|rowspan=4| {{ppc skip}} | |||
|- | |||
| {{riq|Copper Ore|80}} | |||
| {{riq|Copper Ingot|80}} | |||
|- | |||
| {{riq|Iron Ore|80}} | |||
| {{riq|Iron Ingot|80}} | |||
|rowspan=2| {{riq|Circuit Board|80}} | |||
|- | |||
| {{riq|Copper Ore|40}} | |||
| {{riq|Copper Ingot|40}} | |||
|- | |||
| {{riq|Iron Ore|160}} | |||
| {{riq|Iron Ingot|160}} | |||
| {{ppc skip}} | |||
|rowspan=4| {{riq|Electric Motor|80}} | |||
|rowspan=6| {{riq|Electromagnetic Turbine|40}} | |||
|rowspan=9| {{riq|Particle Container|20}} | |||
|- | |||
| {{riq|Iron Ore|80}} | |||
| {{riq|Iron Ingot|80}} | |||
| {{riq|Gear|80}} | |||
|- | |||
| {{riq|Iron Ore|80}} | |||
| {{riq|Magnet|80}} | |||
|rowspan=2| {{riq|Magnetic Coil|80}} | |||
|- | |||
| {{riq|Copper Ore|40}} | |||
| {{riq|Copper Ingot|40}} | |||
|- | |||
| {{riq|Iron Ore|80}} | |||
| {{riq|Magnet|80}} | |||
|rowspan=2| {{riq|Magnetic Coil|80}} | |||
|rowspan=2| {{ppc skip}} | |||
|- | |||
| {{riq|Copper Ore|40}} | |||
| {{riq|Copper Ingot|40}} | |||
|- | |||
| {{riq|Copper Ore|40}} | |||
| {{riq|Copper Ingot|40}} | |||
| {{ppc skip}} | |||
| {{ppc skip}} | |||
| {{ppc skip}} | |||
|- | |||
| {{riq|Coal|120}} | |||
| {{riq|Energetic Graphite|60}} | |||
|rowspan=2| {{riq|Graphene|40}} | |||
|rowspan=2| {{ppc skip}} | |||
|rowspan=2| {{ppc skip}} | |||
|- | |||
| {{riq|Sulfuric Acid|20}} | |||
| {{ppc skip}} | |||
|- | |||
| {{riq|Iron Ore|120}} | |||
| {{riq|Iron Ingot|120}} | |||
| {{riq|Steel|40}} | |||
|rowspan=3| {{riq|Titanium Alloy|40}} | |||
|rowspan=3| {{ppc skip}} | |||
|rowspan=3| {{ppc skip}} | |||
|rowspan=3| {{ppc skip}} | |||
|- | |||
| {{riq|Titanium Ore|80}} | |||
| {{riq|Titanium Ingot|40}} | |||
| {{ppc skip}} | |||
|- | |||
| {{riq|Sulfuric Acid|80}} | |||
| {{ppc skip}} | |||
| {{ppc skip}} | |||
|- | |||
| {{riq|Iron Ore|160}} | |||
| {{riq|Iron Ingot|160}} | |||
| {{ppc skip}} | |||
|rowspan=4| {{riq|Electric Motor|80}} | |||
|rowspan=6| {{riq|Electromagnetic Turbine|40}} | |||
|rowspan=9| {{riq|Particle Container|20}} | |||
|rowspan=9| {{ppc skip}} | |||
|- | |||
| {{riq|Iron Ore|80}} | |||
| {{riq|Iron Ingot|80}} | |||
| {{riq|Gear|80}} | |||
|- | |||
| {{riq|Iron Ore|80}} | |||
| {{riq|Magnet|80}} | |||
|rowspan=2| {{riq|Magnetic Coil|80}} | |||
|- | |||
| {{riq|Copper Ore|40}} | |||
| {{riq|Copper Ingot|40}} | |||
|- | |||
| {{riq|Iron Ore|80}} | |||
| {{riq|Magnet|80}} | |||
|rowspan=2| {{riq|Magnetic Coil|80}} | |||
|rowspan=2| {{ppc skip}} | |||
|- | |||
| {{riq|Copper Ore|40}} | |||
| {{riq|Copper Ingot|40}} | |||
|- | |||
| {{riq|Copper Ore|40}} | |||
| {{riq|Copper Ingot|40}} | |||
| {{ppc skip}} | |||
| {{ppc skip}} | |||
| {{ppc skip}} | |||
|- | |||
| {{riq|Coal|120}} | |||
| {{riq|Energetic Graphite|60}} | |||
|rowspan=2| {{riq|Graphene|40}} | |||
|rowspan=2| {{ppc skip}} | |||
|rowspan=2| {{ppc skip}} | |||
|- | |||
| {{riq|Sulfuric Acid|20}} | |||
| {{ppc skip}} | |||
|} | |||
{| class="wikitable" style="text-align:center; background-color:#0b161c | |||
|+ Crude Oil- and Sulfuric Acid-based production | |||
! Stage 1 | |||
! Stage 2 | |||
! Stage 3 | |||
! Stage 4 | |||
! Stage 5 | |||
! Stage 6 | |||
! Stage 7 | |||
! Stage 8 | |||
|- | |||
| {{riq|Iron Ore|120}} | |||
| {{riq|Iron Ingot|120}} | |||
| {{riq|Steel|40}} | |||
| {{ppc skip}} | |||
| {{ppc skip}} | |||
| {{ppc skip}} | |||
|rowspan=15| {{riq|Planetary Logistics Station|1}} {{riq|Hydrogen|90}} | |||
|rowspan=27| {{riq|Interstellar Logistics Station|1}} {{riq|Hydrogen|180}} | |||
|- | |||
| {{riq|Titanium Ore|80}} | |||
| {{riq|Titanium Ingot|40}} | |||
| {{ppc skip}} | |||
| {{ppc skip}} | |||
| {{ppc skip}} | |||
| {{ppc skip}} | |||
|- | |||
| {{riq|Silicon Ore|320}} | |||
| {{riq|High-Purity Silicon|160}} | |||
|rowspan=2| {{riq|Microcrystalline Component|80}} | |||
|rowspan=4| {{riq|Processor|40}} | |||
|rowspan=4| {{ppc skip}} | |||
|rowspan=4| {{ppc skip}} | |||
|- | |||
| {{riq|Copper Ore|80}} | |||
| {{riq|Copper Ingot|80}} | |||
|- | |||
| {{riq|Iron Ore|80}} | |||
| {{riq|Iron Ingot|80}} | |||
|rowspan=2| {{riq|Circuit Board|80}} | |||
|- | |||
| {{riq|Copper Ore|40}} | |||
| {{riq|Copper Ingot|40}} | |||
|- | |||
| {{riq|Iron Ore|160}} | |||
| {{riq|Iron Ingot|160}} | |||
| {{ppc skip}} | |||
|rowspan=4| {{riq|Electric Motor|80}} | |||
|rowspan=6| {{riq|Electromagnetic Turbine|40}} | |||
|rowspan=9| {{riq|Particle Container|20}} {{riq|Hydrogen|90}} | |||
|- | |||
| {{riq|Iron Ore|80}} | |||
| {{riq|Iron Ingot|80}} | |||
| {{riq|Gear|80}} | |||
|- | |||
| {{riq|Iron Ore|80}} | |||
| {{riq|Magnet|80}} | |||
|rowspan=2| {{riq|Magnetic Coil|80}} | |||
|- | |||
| {{riq|Copper Ore|40}} | |||
| {{riq|Copper Ingot|40}} | |||
|- | |||
| {{riq|Iron Ore|80}} | |||
| {{riq|Magnet|80}} | |||
|rowspan=2| {{riq|Magnetic Coil|80}} | |||
|rowspan=2| {{ppc skip}} | |||
|- | |||
| {{riq|Copper Ore|40}} | |||
| {{riq|Copper Ingot|40}} | |||
|- | |||
| {{riq|Copper Ore|40}} | |||
| {{riq|Copper Ingot|40}} | |||
| {{ppc skip}} | |||
| {{ppc skip}} | |||
| {{ppc skip}} | |||
|- | |||
| {{riq|Crude Oil|60}} | |||
| {{riq|Refined Oil|60}} {{riq|Hydrogen|30}} | |||
| {{riq|Energetic Graphite|60}} {{riq|Hydrogen|90}} | |||
|rowspan=2| {{riq|Graphene|40}} {{riq|Hydrogen|90}} | |||
|rowspan=2| {{ppc skip}} | |||
|- | |||
| {{riq|Sulfuric Acid|20}} | |||
| {{ppc skip}} | |||
| {{ppc skip}} | |||
|- | |||
| {{riq|Iron Ore|120}} | |||
| {{riq|Iron Ingot|120}} | |||
| {{riq|Steel|40}} | |||
|rowspan=3| {{riq|Titanium Alloy|40}} | |||
|rowspan=3| {{ppc skip}} | |||
|rowspan=3| {{ppc skip}} | |||
|rowspan=3| {{ppc skip}} | |||
|- | |||
| {{riq|Titanium Ore|80}} | |||
| {{riq|Titanium Ingot|40}} | |||
| {{ppc skip}} | |||
|- | |||
| {{riq|Sulfuric Acid|80}} | |||
| {{ppc skip}} | |||
| {{ppc skip}} | |||
|- | |||
| {{riq|Iron Ore|160}} | |||
| {{riq|Iron Ingot|160}} | |||
| {{ppc skip}} | |||
|rowspan=4| {{riq|Electric Motor|80}} | |||
|rowspan=6| {{riq|Electromagnetic Turbine|40}} | |||
|rowspan=9| {{riq|Particle Container|20}} {{riq|Hydrogen|90}} | |||
|rowspan=9| {{ppc skip}} | |||
|- | |||
| {{riq|Iron Ore|80}} | |||
| {{riq|Iron Ingot|80}} | |||
| {{riq|Gear|80}} | |||
|- | |||
| {{riq|Iron Ore|80}} | |||
| {{riq|Magnet|80}} | |||
|rowspan=2| {{riq|Magnetic Coil|80}} | |||
|- | |||
| {{riq|Copper Ore|40}} | |||
| {{riq|Copper Ingot|40}} | |||
|- | |||
| {{riq|Iron Ore|80}} | |||
| {{riq|Magnet|80}} | |||
|rowspan=2| {{riq|Magnetic Coil|80}} | |||
|rowspan=2| {{ppc skip}} | |||
|- | |||
| {{riq|Copper Ore|40}} | |||
| {{riq|Copper Ingot|40}} | |||
|- | |||
| {{riq|Copper Ore|40}} | |||
| {{riq|Copper Ingot|40}} | |||
| {{ppc skip}} | |||
| {{ppc skip}} | |||
| {{ppc skip}} | |||
|- | |||
| {{riq|Crude Oil|60}} | |||
| {{riq|Refined Oil|60}} {{riq|Hydrogen|30}} | |||
| {{riq|Energetic Graphite|60}} {{riq|Hydrogen|90}} | |||
|rowspan=2| {{riq|Graphene|40}} {{riq|Hydrogen|90}} | |||
|rowspan=2| {{ppc skip}} | |||
|- | |||
| {{riq|Sulfuric Acid|20}} | |||
| {{ppc skip}} | |||
| {{ppc skip}} | |||
|} | |||
'''Note:''' [[Hydrogen]] created during Crude Oil-based production must be recycled through the system to ensure full efficiency. Hydrogen quantity shown in Stage 8 is remaining surplus Hydrogen which can be diverted elsewhere. | |||
==Used In== | ==Used In== | ||
{{ProductionChainTable/head}} | {{ProductionChainTable/head}} | ||
{{ProductionChain | {{ProductionChain | ||
|Building= | |Building=Assembler | ||
|Replicator= | |Replicator=Yes | ||
|Technology= | |Technology=Gas Giants Exploitation | ||
|Recipe= | |||
|Recipe= | |||
{{ItemRecipe | {{ItemRecipe | ||
|Out1= | |Out1=Orbital Collector | ||
|Out1Qty=1 | |Out1Qty=1 | ||
|CraftTime= | |CraftTime=30 s | ||
|In1= | |In1=Interstellar Logistics Station | ||
|In1Qty=1 | |In1Qty=1 | ||
|In2= | |In2=Super-Magnetic Ring | ||
|In2Qty= | |In2Qty=50 | ||
|In3= | |In3=Reinforced Thruster | ||
|In3Qty= | |In3Qty=20 | ||
|In4= | |In4=Full Accumulator | ||
|In4Qty= | |In4Qty=20 | ||
}} | }} | ||
}} | }} | ||
|} | |} | ||
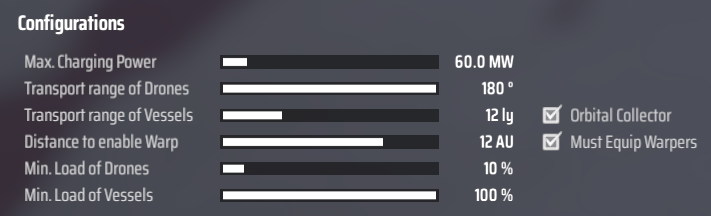
==Operational Configuration and Settings== | |||
[[File:ILS Configurations.png|thumb|Configuration Settings of Interstellar Logistic Station]] | |||
===Max Charging Power (Slider)=== | |||
===Transport range of Drones (Slider)=== | |||
===Transport range of Vessels (Slider)=== | |||
===Distance to enable Warp (Slider)=== | |||
===Min. Load of Drones (Slider)=== | |||
===Min. Load of Vessels (Slider)=== | |||
===Orbital Collector (Checkbox)=== | |||
===Must Equip Warpers (Checkbox)=== | |||
==Configuring Logistics== | |||
Local Storage and Remote Demand will make the station demand items from remote stations for output via belts. | |||
Local Storage and Remote Supply will make the station supply items for remote stations. | |||
Local Demand and Remote Storage will make the station demand items from local (same planet) stations for output via belts. | |||
===Local Settings=== | |||
* Local Storage - Items in the station should be kept locally for output via belt, do not request or send items to stations on the same planet. | |||
* Local Supply - Items in this station should be available to stations on the same planet via logistics drones. | |||
* Local Demand - Items from stations on this planet should be brought to this station. | |||
===Remote Settings=== | |||
* Remote Storage - Items in this station should be kept locally (on the same planet) for output via belt, do not request or send items to stations on other planets. | |||
* Remote Supply - Items in this station should be available to stations on other planets via logistics vessels. | |||
* Remote Demand - Items from stations on other planets should be brought to this station via logistics vessels. | |||
==Player Tips & Tricks== | ==Player Tips & Tricks== | ||
* Each [[Interstellar Logistics Station]] can host up to 50 [[Logistics Drone]]s and up to 10 [[Logistics Vessel]]s. | |||
* Power draw of the station is proportional to the amount of current energy loss. This means that at 0 J, the total max charging power will be utilized across the power grid, and the power draw proportionally decreases the more the energy is stored in the station. | |||
** At a max charging power of 60 MW, the station will draw 54 MW when it only has 1.2 GJ stored (60 MW * (12 GJ - 1.2 GJ)/12 GJ) | |||
** At a max charging power of 60 MW, the station will draw 6 MW when it only has 10.8 GJ stored (60 MW * (12 GJ - 10.8 GJ)/12 GJ) | |||
** Because of this, power draw is relatively low once the station is charged, but it can overload low power networks when first created. | |||
===Note about inter-star logistics=== | |||
[[Logistics_Vessel|Logistics Vessels]] can move items between planets from different stars, once [[Logistics_Carrier_Engine_(Upgrade)|Logistics Carrier Engine]] is upgraded to level 4. This upgrade allows logistics vessels to initiate warp, and also adds a special slot to [[Interstellar_Logistics_Station|Interstellar Logistics Stations]] for storing [[Space_Warper|Space Warpers]]. | |||
When a logistics vessel undertakes an inter-star journey, it will attempt to take 2 Space Warpers from the dedicated Space Warper slot of its Interstellar Logistics Station. | |||
'''Warning''': if no Space Warpers are available, logistics vessels will still attempt to make inter-star journeys if "Must Equip Warpers" is not checked on the Interstellar Logistics Station, which may take hours. | |||
[[Category:Item]] | [[Category:Item]] | ||
[[Category: | [[Category:Building]] | ||
[[Category:Logistics]] | |||
[[Category:Crafting Material]] | |||
Revision as of 06:35, 6 March 2021
| Storage | 5 types | |
| Max Charging Power | 300 MW | |
| Idle Consumption | 60 kW | |
| Accumulated | 12.0 GJ | |
| Made In | Assembler | |
| Hand-Make | Replicator | |
| Stack Size | 10 |
Summary
You can find a tutorial on how the logistics stations work here.
Production Chain
| Recipe | Building | Replicator? | Technology |
|---|---|---|---|
| ✔ |

Production Progression Chart
| Stage 1 | Stage 2 | Stage 3 | Stage 4 | Stage 5 | Stage 6 |
|---|---|---|---|---|---|
| Stage 1 | Stage 2 | Stage 3 | Stage 4 | Stage 5 | Stage 6 | Stage 7 | Stage 8 |
|---|---|---|---|---|---|---|---|
| Stage 1 | Stage 2 | Stage 3 | Stage 4 | Stage 5 | Stage 6 | Stage 7 | Stage 8 |
|---|---|---|---|---|---|---|---|
| Stage 1 | Stage 2 | Stage 3 | Stage 4 | Stage 5 | Stage 6 | Stage 7 | Stage 8 |
|---|---|---|---|---|---|---|---|
Note: Hydrogen created during Crude Oil-based production must be recycled through the system to ensure full efficiency. Hydrogen quantity shown in Stage 8 is remaining surplus Hydrogen which can be diverted elsewhere.
Used In
| Recipe | Building | Replicator? | Technology |
|---|---|---|---|
| ✔ |

Operational Configuration and Settings

Max Charging Power (Slider)
Transport range of Drones (Slider)
Transport range of Vessels (Slider)
Distance to enable Warp (Slider)
Min. Load of Drones (Slider)
Min. Load of Vessels (Slider)
Orbital Collector (Checkbox)
Must Equip Warpers (Checkbox)
Configuring Logistics
Local Storage and Remote Demand will make the station demand items from remote stations for output via belts.
Local Storage and Remote Supply will make the station supply items for remote stations.
Local Demand and Remote Storage will make the station demand items from local (same planet) stations for output via belts.
Local Settings
- Local Storage - Items in the station should be kept locally for output via belt, do not request or send items to stations on the same planet.
- Local Supply - Items in this station should be available to stations on the same planet via logistics drones.
- Local Demand - Items from stations on this planet should be brought to this station.
Remote Settings
- Remote Storage - Items in this station should be kept locally (on the same planet) for output via belt, do not request or send items to stations on other planets.
- Remote Supply - Items in this station should be available to stations on other planets via logistics vessels.
- Remote Demand - Items from stations on other planets should be brought to this station via logistics vessels.
Player Tips & Tricks
- Each Interstellar Logistics Station can host up to 50 Logistics Drones and up to 10 Logistics Vessels.
- Power draw of the station is proportional to the amount of current energy loss. This means that at 0 J, the total max charging power will be utilized across the power grid, and the power draw proportionally decreases the more the energy is stored in the station.
- At a max charging power of 60 MW, the station will draw 54 MW when it only has 1.2 GJ stored (60 MW * (12 GJ - 1.2 GJ)/12 GJ)
- At a max charging power of 60 MW, the station will draw 6 MW when it only has 10.8 GJ stored (60 MW * (12 GJ - 10.8 GJ)/12 GJ)
- Because of this, power draw is relatively low once the station is charged, but it can overload low power networks when first created.
Note about inter-star logistics
Logistics Vessels can move items between planets from different stars, once Logistics Carrier Engine is upgraded to level 4. This upgrade allows logistics vessels to initiate warp, and also adds a special slot to Interstellar Logistics Stations for storing Space Warpers.
When a logistics vessel undertakes an inter-star journey, it will attempt to take 2 Space Warpers from the dedicated Space Warper slot of its Interstellar Logistics Station.
Warning: if no Space Warpers are available, logistics vessels will still attempt to make inter-star journeys if "Must Equip Warpers" is not checked on the Interstellar Logistics Station, which may take hours.